- Français
- English
How to turn old PC to a router with pfSense
06.09.2023

If you have an old PC that you don't use anymore, you might be wondering what to do with it. One option is to turn it into a router using pfSense, a free and open source software that can transform any PC into a powerful and flexible firewall and router.
In this blog post, we will show you how to install and configure pfSense on an old laptop and turn it into a router for your home network.
What is pfSense?
pfSense is a software distribution based on FreeBSD, a Unix-like operating system that is known for its stability and security. pfSense can run on any x86 or x86_64 hardware, from embedded devices to servers. pfSense provides a web-based interface for managing and configuring various network services, such as DHCP, DNS, VPN, NAT, firewall rules, traffic shaping, and more. pfSense also supports many packages that can extend its functionality, such as Snort (an intrusion detection system), Squid (a proxy server), and Suricata (a network security monitoring tool).
Why use pfSense?
There are many reasons why you might want to use pfSense as your router instead of a consumer-grade router that you can buy from a store. Here are some of them:
You can save money by reusing your old PC instead of buying a new router;
You can customize your router to suit your needs and preferences, with more options and features than a typical router;
You can improve your network security and performance by using pfSense's advanced firewall and routing capabilities;
You can learn more about networking and how routers work by using pfSense.
What do you need?
To turn your old PC into a router using pfSense, you will need:
An old PC with at least one Ethernet port and a CD-ROM drive or USB port. For this guide, I will use an HP Pavilion dv6 laptop with an Intel i5 processor, 4 GB of RAM, and 500 GB of HDD. Suggested hardware for running pfSense: 1GHz CPU, 1 GB of RAM, 4GB of storage, 2 or more PCI-e network interface cards.
A USB flash drive or a CD with pfSense image downloaded from https://www.pfsense.org/download/. For this guide, we will use a USB flash drive with pfSense 2.4.5 image for AMD64 architecture.
A USB to Ethernet adapter if your PC does not have two Ethernet ports. For this guide, we will use a TP-Link UE300 USB 3.0 to Gigabit Ethernet adapter.
A network cable to connect your PC to your modem or another router.
A monitor, keyboard, and mouse to install and configure pfSense on your PC.
How to install pfSense?
To install pfSense on your old PC, follow these steps:
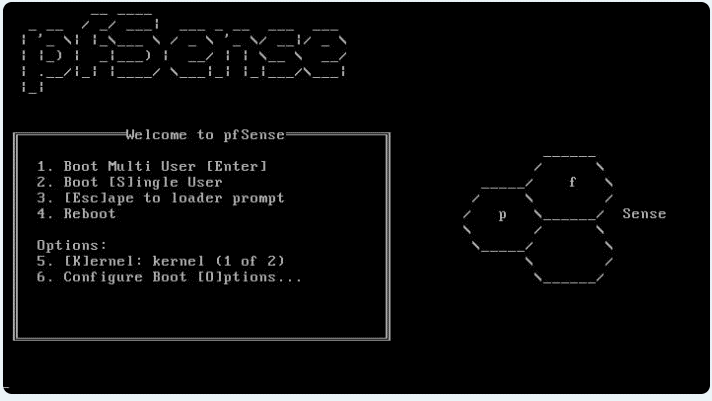
Connect your USB flash drive or CD-R with pfSense image to your PC and boot from it. You might need to change the boot order in your BIOS settings to do so.
Select "Install" from the pfSense boot menu and press Enter.
Select your preferred keyboard layout and press Enter.
Select "Auto (UFS)" as the partitioning method and press Enter.
Select "Entire Disk" as the disk configuration and press Enter.
Select "Accept" to confirm the disk changes and press Enter.
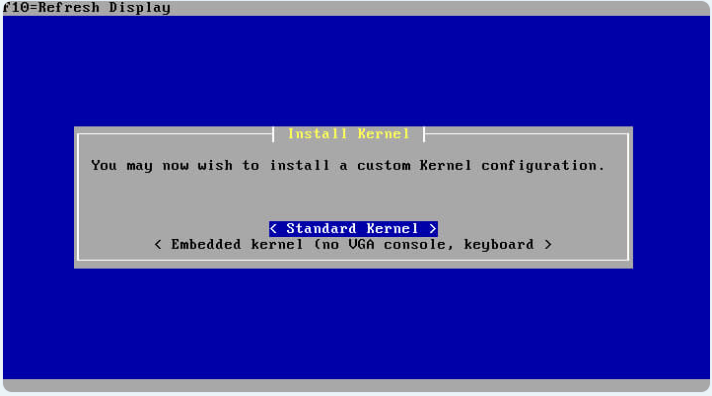
Select "Standard Kernel" as the kernel configuration and press Enter.
Wait for the installation process to complete and press Enter when prompted to reboot.
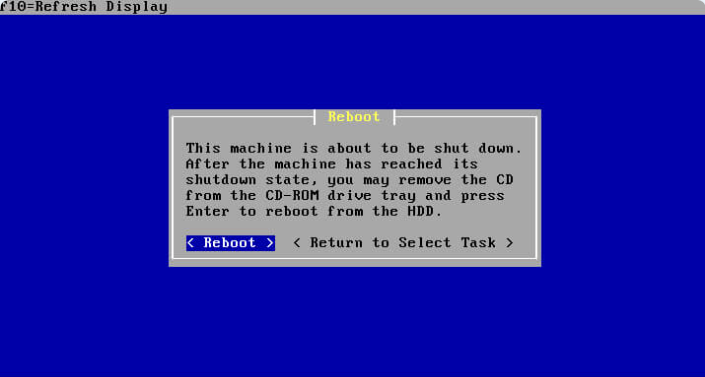
Remove your USB flash drive or CD-R from your PC and boot from the hard drive.
How to configure pfSense?
To configure pfSense on your old PC, follow these steps:
Connect your network cable from your modem or another router to your PC's Ethernet port (the one that is not connected to the USB adapter).
Connect your USB adapter to your PC's USB port and another network cable from the adapter to your switch or another device on your LAN.
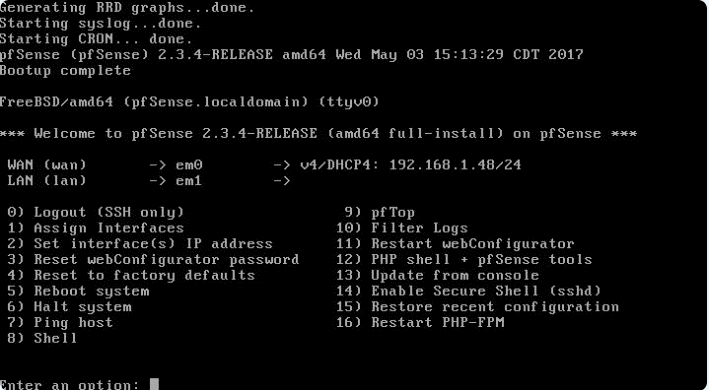
Turn on your PC and wait for pfSense to boot up.
On the console menu, select option 1 "Assign Interfaces" and press Enter.
Press "n" when asked if you want to set up VLANs and press Enter.
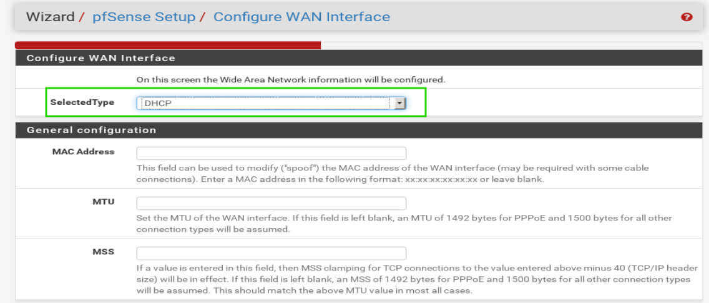
Press "a" when asked if you want to auto-detect the WAN interface and press Enter.
Wait for pfSense to detect your WAN interface (em0 in this example)
Assign LAN interface (em1 in this example):

Configure Ipv4 address for the LAN interface:
![]()
In the next step, you’ll be asked for the subnet mask:

Then, we’d be ask to set WAN and LAN gateway, to configure Ipv6 on the LAN interface and to setup DHCP server:

The next question will ask to revert web tool to HTTP:
![]()
Then, we’ll save changes:

After configuration, we can access web interface through a web browser by navigating the IP address of the LAN interface:
Once you log in to the web interface, you will see a dashboard that displays some information about your system and network. You can also access various menus and tabs to configure different aspects of pfSense. Here are some of the basic settings that you should configure:
General Setup: This is where you can change the hostname, domain name, DNS servers, time zone, and other general settings of pfSense. You can access this menu by going to System > General Setup.
Interfaces: This is where you can assign and configure the network interfaces of pfSense. You can access this menu by going to Interfaces > Assignments. You should have at least two interfaces: one for WAN (the internet) and one for LAN (your local network). You can also create additional interfaces for other networks or VLANs if needed. For each interface, you can set the IP address, subnet mask, gateway, DHCP server, and other options.
Firewall Rules: This is where you can create and manage the firewall rules that control the traffic between your networks and the internet. You can access this menu by going to Firewall > Rules. For each interface, you can create rules that allow or block specific protocols, ports, sources, destinations, and other criteria. You can also create aliases, schedules, and groups to simplify your rules. By default, pfSense blocks all incoming traffic on the WAN interface and allows all outgoing traffic on all interfaces. You can modify these default rules or create new ones according to your needs.