Microsoft Purview offers a robust framework for information classification and protection, enabling organizations to categorize and secure data across various services and platforms. This guide delves into the process of creating labels and classification policies within Microsoft Purview, ensuring your data is managed and protected efficiently.
Understanding Information Classification in Microsoft Purview
Information classification in Microsoft Purview involves categorizing data based on its sensitivity and the level of protection it requires. This process is facilitated by creating labels that can be applied to documents and emails, which help in identifying, classifying, and protecting data throughout its lifecycle.
The configuration steps
Note: For this guide, we will use the new Purview console that combines compliance globally, at the Microsoft 365 tenant level, including Microsoft 365, Azure, as well as the possibility to connect external sources for compliance.
Let’s begin!
1. Browse to https://purview.microsoft.com/, and log in with your credentials.
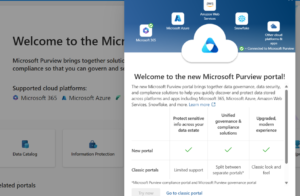
2. In case the new Microsoft Purview screen shows, ensure you accept the terms, and click on Try now located at the bottom of the screen (it will become clickable):
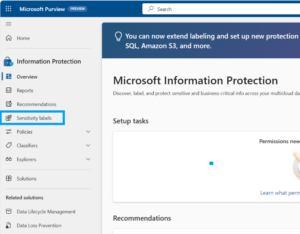
3. Click on Information Protection:

4. Click on Sensitivity labels located on the left menu:
5. This is the main page to configure sensitivity labels. Labels are applied at individual items to help with the classification process. Click on + Create a label:

6. At this stage, it is required to provide basic information regarding your sensitivity label, such as its name, the assignment priority, the description for uses (that is a mandatory field, informs users through applications as to what this is about), as well as another description for administrators. Once complete, click on Next:

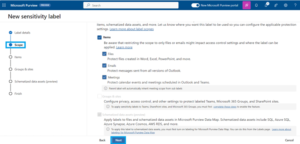
7. The next step allows us to filter on what items the sensitivity label can be applied (files, emails, meetings with Teams and Outlook, and more). If you want to cover all data, you can select everything. By doing so, the next screens will adapt to what is selected here, so that we can individually specify the settings for each. Once your selection is done, click on Next:
8. Now, as we have selected items, we need to decide what kind of security will apply to them. As you can see, you can further control access to the information, use watermarks, and more. Click Next once your choice is done:

9. This step in access control involves the selection of users and groups that will be authorized to use the content on which the sensitivity label will be applied. By clicking on Assign permissions now, you can make your selection. Click on Save (will become clickable). Note you can also provide other values such as content expiration, offline access and more. Click on Next to continue then (will become clickable):

10. Since we have selected the watermarking earlier, we can now setup a watermark text to be displayed at some parts of your files. Enable the content marking, provide values, click on Save, and then Next to pursue:

11. Here, we can enable auto-labeling, a feature that will automatically apply a label based on the content of the file or data itself. For example, it can investigate the format of the data to determine if the label must be applied, without user intervention. We have setup a filter to match credit card numbers. Click on Add within the Content contains filter, then sensitive info types, and search for a data format, (or leave it blank to see any appear) and make your selection:

12. Provide a display message for users (recommended) and click on Next to continue:

13. Here, you have the possibility of protecting Microsoft 365 groups, as well as SharePoint sites. It does require some prerequistes to make these items clickable, so in our case we will not do any changes here. Click Next to continue:

14. This section introduces new ways to secure information, such as the one that is found outside of the Microsoft 365 SaaS, for example in Azure, AWS and more. Click on Next at this step:

15. Now, we are ready to create the label. Review the settings that have been created in the wizard, and click on Create label to proceed:

16. A successful label creation message will show once the process is completed. With it, you will find the possibility to create a policy that will distribute the label to the users automatically, and apply the labels to the existing content. This is accomplished by clicking on the Automatically apply label to sensitive content radio button. Click on Done once your choice has been made:

17. Click on Create policy after you review the settings it will apply:

18. Click on Close to confirm the creation of the policy has been completed:

19. Now, in the Sensitivity labels menu, you will find the label you have created earlier, active and ready to use:

20. There will also be a policy that auto-applies it as well, located in the Auto-labeling policies menu at the left (under Policies):

21. By clicking on the policy, you will notice it is not yet ready to use, as it first scans for matching items. This is a search of all matching content:

22. Once it has done its work, it will be in a simulation mode, a sort of audit and read-only mode allowing you to see matching items, as well as to enable the policy if you want:

Additionally, once the detection is completed, an email is sent to administrators informing them the content is ready to be viewed:

Conclusion
Information classification in Microsoft Purview empowers organizations to manage and protect their data effectively, aligning with compliance requirements and security best practices. By creating labels and establishing classification policies, organizations can ensure that sensitive information is adequately protected while remaining accessible to authorized users. Embracing information classification in Microsoft Purview is a critical step toward enhancing your organization’s data security and compliance posture. With Eccentrix’s expert training on Purview, you are well-prepared to navigate the complexities of data protection in the digital age, ensuring your organization’s information assets are secure and well-managed.